Showing posts with label Hacking Tips. Show all posts

Tuesday, April 8, 2014

How to remote control Raspberry Pi desktop screen from Windows

Aim of tutorial: To remote control / share Raspberry pi desktop screen to your Windows computer or Iphone / Ipad / Android / Windows Phone.

Pre-requisites:
> Raspberry pi running Wheezy raspbian OS and connected to a home network router wired /wirelessly.
> Internet enabled on rapsberry Pi
> Ip address of raspberry Pi (ifconfig command)


Step 1: Login to raspberry Pi via putty or connect the raspberry pi to a TV and start the terminal.

Step 2: You can either login as Pi user or root user. remember to add sudo before using any command if logging in as pi user.Find out your IP address using:
ifconfig eth0 or ifconfig wlan0

Step 3: Use the following command and hit enter:

sudo apt-get install xrdp

after the installation completes your XRDP service should now be able to survive reboot also.

chkconfig --level 2345 xrdp on
(you may need to install chkconfig first)

Step 4: Windows PC users can use the in-built program to access their raspberry Pi screen as follows:

 Press the start button and search for "Remote Desktop Connection"

> Start the program by clicking it.
> Enter the Ip-address of raspberry Pi into the computer field and connect.


> You will be welcomed to enter your raspberry Pi login and password.


> The default login for raspberry Pi is , Login Id: pi and password: raspberry
> After a few seconds your raspberry pi's desktop screen will be in front of your eyes.


It is also possible to access your raspberry pi from remote location by port forwarding your router / gateway with Port number: 3389.

Android Users:
You can download "Microsoft Remote Desktop" app from Google Playstore and configure it the same way to access your raspberry pi screen on your android Phone or Tablet.

Windows Phone users:
You can download "ConnectMe" app from windows market place and configure it by entering your raspberry Pi ip address.


Read more...

Sunday, March 2, 2014

How to turn an old Wireless Router to a Wireless repeater OR extend an existing wireless network using DD-WRT firmware.

AIM of Tutorial: To turn a Wi-Fi Router into a WiFi - Card or WiFi - Extender / Repeater to an existing Wireless Network. OR To extend a Wireless Network, wirelessly using another Wifi Router.


Have a spare or outdated router ? If YES ! then here is how to make smart use of it.
All you need to do first is to check the DD-WRT support and custom firmware which needs to be installed before going ahead.

My Network configuration:

1st Router Model:                   Netgear JWNR2000 (Factory Firmware)
1st Router Access:                  192.168.1.1  (DHCP ENABLED)
1st Router Wireless Network: SSID: SoftwareKing
                                               Security type: WPA2 Personal
                                               Encryption Method: AES only
                                               Security Key: mykey12233221

2nd Router Model:                 D-Link DIR-615 E4   (might work with other H/W versions also)
Flashed DDWRT ROM:        (Non- Factory) v24 Pre SP2 [Beta] Build: 21061  (Default settings)
2nd Router access:                 Default IP: 192.168.1.1
                                             Username: admin
                                             Password: admin

Assuming you have already flashed this custom DD-wrt firmware on your router, we will go ahead..

1. > Make a note of your 1st Router's Security type, Encryption Method, Security Key like I have done above. (No changes have been done on 1st router for this tutorial)


On the 2nd Router :


1.> On the main screen, Go to the "Status" Tab and then "Wireless" tab below.

1.1 Scroll down on this page to find the button "Site Survey"


1.2 Click on "Site Survey" to find the wireless networks available nearby.

1.3 Click on "Join" on the specific network to which you want your 2nd router connect to. Say for example: wireless network SoftwareKing being broadcast-ed from my 1st router.

2.> Joining the Network will take me automatically to the Wireless configuration page having the details automatically filled.

2.2 On the same page: Set "Wireless Mode" to "Client" and SAVE.

2.3 Now go to "Wireless Security" and enter the Security Type as WPA2 PersonalAES and the Key: mykey123321 (that matches your 1st router) and SAVE Only.

2.4 Now back to "Basic settings" under Wireless , you will see Virtual interfaces menu,
2.5 Add a virtual interface
2.6 Select Wireless mode: AP
2.7 Wireless Network Name: Anything you like, apart from the 1st router's ssid.
2.8 Wireless ssid broadcast: Enabled
2.9 Advance settings : Un-ticked
and then go to "Wireless Security" and enter the Security Type as, WPA2 PersonalAES and the Key: 2ndmykey123321 SAVE and APPLY.

3.> Now under "Setup" Tab select "Basic setup"
3.1 Set "Connection type" to "Static IP" and set an IP address of range 192.168.1.xxx ( I have set 192.168.1.8)

3.2 Now, Scroll below and set Router IP address to:

Ip Address :192.168.2.1
Subnet mask :255.255.255.0
Gateway: 0.0.0.0 
Local DNS: 0.0.0.0

3.3 Scroll down to DHCP settings and disable the DHCP Server and then SAVE and APPLY.

4.> Now your router will restart and will be accessible only from 192.168.2.1 in the address bar.

4.1 Assign Static IP addresses to all the devices connected to 2nd Router of range 192.168.2.xxx because we have disabled DHCP server on it. 

Note that: The 2nd router will have its own subnet, but services available on 1st subnet would be accessible from 2nd.

And then you can simply connect your 2nd router to another wall socket, may be in other room and connect your to your extended wireless network, via a wired LAN cable or wirelessly.
You will now be able to access internet and other services on all those devices connected to your 2nd router too.

Scope for improvement: Setting up configuration without having another sub-net in 2nd router.


Read more...

Saturday, July 7, 2012

How to sniff Passwords in Wired/Wireless LAN Using Ettercap-Gtk. Man in the Middle Attack caused by ARP poisioning.

Aim of Tutorial : To sniff passwords from all the users in LAN by ARP Poisioning in Linux Backtrack5.

 
Ettercap:
Ettercap is a tool for network protocol analysis and security auditing. It has the ability to intercept traffic on a network, capture passwords, and conduct active eavesdropping against common protocols.

For this exercise I will be using ARP Poisoning to sniff the LAN for passwords that use SSL (Hotmail, Gmail, Etc.)

ARP:
“Address Resolution Protocol”: As defined by Wikipedia: ARP is a computer networking protocol for determining a network host's link layer or hardware address when only its Internet Layer (IP) or Network Layer address is known. This function is critical in local area networking as well as for routing internetworking traffic across gateways (routers) based on IP addresses when the next-hop router must be determined.
So in normal terms ARP is the way that we get a MAC address of a Host or Node from the IP address.

ARP Spoofing:
This is the technique we will use to attack a wired or a wireless network. ARP Spoofing allows the attacker to sniff data frames from the LAN, then gives you the ability to modify the traffic (good for redirecting to your own computer to download an exploit to victim), or stop the traffic from entering the network, or a specific computer (good for local DOS Attacks on a Local Area Network).

The idea behind the attack is to send a fake (AKA “Spoofed”) ARP message to the LAN. Any traffic on the network meant for that IP address that you attacked (whole network if you want) will be sent to the attacker. The attacker (you) can choose to forward the traffic to the actual gateway (Passive Sniffing) or modify the data before forwarding it (Man in the Middle).

How we will do it for this exercise:

1.> Edit a file:

We first have to edit one file (Don’t worry, we just have to delete two # signs to “uncomment” them).

The file we will be editing is called etter.conf and it can be found under the etc folder. (Full Path = /etc/etter.conf) with this command in terminal :-
                           gedit /etc/etter.conf

We need to change the part under the “redir_command_on/off” section.

MAKE SURE YOU ONLY UNCOMMENT THE TWO LINES UNDER “if you use iptables

The Linux subsection will look like this when done:
Code:
#---------------
#     Linux
#---------------

# if you use ipchains:
   #redir_command_on = "ipchains -A input -i %iface -p tcp -s 0/0 -d 0/0 %port -j REDIRECT %rport"
   #redir_command_off = "ipchains -D input -i %iface -p tcp -s 0/0 -d 0/0 %port -j REDIRECT %rport"

# if you use iptables:
   redir_command_on = "iptables -t nat -A PREROUTING -i %iface -p tcp --dport %port -j REDIRECT --to-port %rport"
   redir_command_off = "iptables -t nat -D PREROUTING -i %iface -p tcp --dport %port -j REDIRECT --to-port %rport"

Notice how there are no Hash (#) signs in front of the last two lines.

2.> Run Ettercap:

Now we can start Ettercap-GTK (This is a pretty version of the shell program, it gives us a nice GUI to play with). Ettercap-GTK can be found under: Menu -> Backtrack -> Privilege Escalation -> Spoofing -> Ettercap-GTK

3.> Setting up Sniffing:


Sniff -> Unified Sniffing

Eth0 -> OK ………………………..(This runs Sniffing on your first Ethernet card)

Hosts -> Scan for hosts ………… (Scans the network for targets)

Hosts -> Hosts List ………………….(Opens your hosts list


4.> Targeting the Hosts on the gateway:-


Now, you have all the computers on the network on the host list. If you want to only scan one computer (its better and quicker for us to just do the one) then click on the default gateway first, and click the target 1 button.

 After you do the default gateway, then click your computer you are attacking and make it “Target 2” by selecting it and clicking the “target 2” button.

5.> After setting up the sniffing:

Mitm -> ARP poisoning -> Select “Sniff remote connections” Hit OK

Start -> Start Sniffing

Your done! Now you are sniffing the computer for passwords onto certain websites that use SSL for their security. When you are done go to: Start -> Stop Sniffing, and then go to Mitm -> Stop mitm attack(s)


Note: If in case you wish to check whether the ARP poisoning was successful or not you can select Plugins from the menu bar and select, Check Poisson plugin, It takes a little while to show the message " Poisoning was successful :)"


Read more...

Thursday, July 5, 2012

Hack Windows Admin / User passwords using Linux Bactrack4

Want to hack your sister's or Brother's account or your boss's secret files at office ?? here's its one of the methods to do so.
Not only the username and pass words but also you can disable the "syskey" they have applied even before the windows users ask you for the password.


>> Boot backtrack 4 OS dvd or using pendrive.

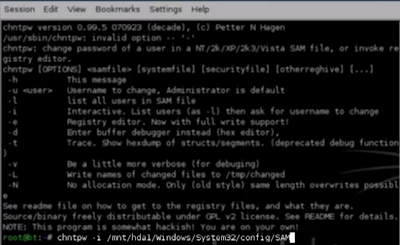
>> Press >> Start button >> Backtrack >> Privelege Escalation >> Password attacks >> "chntpw".

This will open a "shell" or a command prompt in windows language.
>> At the last line, You should see "root@bt:~#" as command line.

>> At this line you should type the whole path of the SAM file located on Windows as follows:

chntpw -i /mnt/hda1/Windows/System32/config/SAM


>> If this doesnt work, then you should first locate the drive in which your windows is installed, for example, My windows is installed in "hda1" so i have written "hda1" in the above line. Also you should note the exact capital letters for "Windows" and "Sytem32" used.

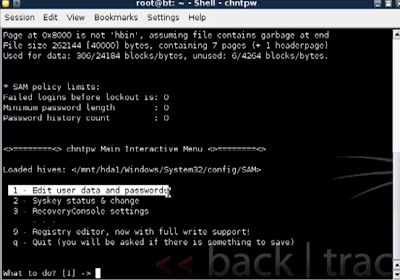
>>Hit "enter" after the line, to see this window which is interactive to user showing several options like this:


1.>> Edit user data and password.
2.>> Syskey status and change it. etc.

>> At the last line you see "What to do? [1]->"
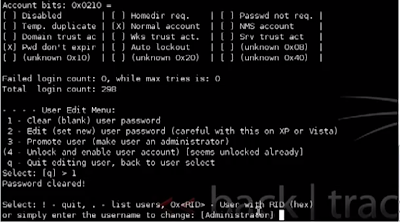
then just type the menu number in front of the desired hack, for example "1" and hit "enter". You should see this menu now:

>>> Type in the username which you wish to edit.
and select the menu options for it.

For example, type "josh" and select the menu no. from the list below:


1.>> Clear user password.
2.>> Edit user password.
3.>> Promote user.
and many more.


>> After doing the task select "quit" and boot back to windows with administrator rights or to see user's data inside windows.
Read more...

Sunday, July 1, 2012

Hacking Wi-Fi WEP - Key Protected Networks Using Bactrack 4, 5

Aim Of Tutorial: Hacking Wi-fi Network secured with WEP key Encryption


Hi everyone, Today am here to how you a very simple and effective way to hack Wi-Fi network secured with WEP key.


Please follow the steps given below accurately:-

1.> Boot Backtrack 5 in normal Text-Mode (1st Choice) when booting menu appears, then enter startx for starting GUI interface of BT5.

2.> Open a Terminal, type the following commands:-

airmon-ng start wlan0
 
This command will list the available WLAN (Wi-Fi card available in System) and also
Show the another name of the same Wi-Fi card such as mon0.
We will now onwards use the mon0 interface name in all the following commands.
The Wi-Fi card is now in monitor mode.
 
3.> Now in the Same Terminal window, Type: 
 
airodump-ng mon0
 
This will list all the Wireless LAN networks Available nearby, 
To Stop the scanning after noticing the target Wi-Fi network, Press cntrl+c
  
4.>Copy the MAC-ID or BSSID of the target network. For example,00:11:22:33:44:55,
 also note down the channel number ( my case was 3).
 
Now type the following Command in the Terminal,
 
 airodump-ng -c 3 -w wep  --bssid  00:11:22:33:44:55 mon0
 
5.> Open a New Terminal, and type:

              aireplay-ng -1 0 -a 00:11:22:33:44:55 mon0
 
 (if you see under #Data, you will notice its increasing slowly)
To Speed this #data value,
 
6.> Again Open a new Terminal and type:
 
        aireplay-ng -3 –b 00:11:22:33:44:55 mon0

--> wait till data reaches 30,000
7.> In capturing window, Press cntrl+C to top capturing data.
 
8.> Use the following command to list the Directory of saved captured Files. 

                                Dir
9.> Then, Type:
   
Aircrack-ng wep-01.cap
 
to crack the Wi-Fi password by mentioning the capture file (wep-01.cap).
 
10.> Now you jut have to wait, until the WEP-Key is Found.
 
11.> Please note that, some routers only Show HEX digits of the WEP key
To use this key in Windows to log on to a Wireless Network, Do not include
the Colons (:) between the HEX Pairs.
 
For Example, If you got the Key like 1A:2B:3C:4D:5F, then in windows while
connecting to the hacked Wi-Fi Network, use 1A2B3C4D5F (w/O colon sign).
!! Enjoy !! 


Read more...

Tuesday, May 22, 2012

Vodafone ZTE K3770-z USB 3G Modem Unlock

Aim of Tutorial: To make use of Factory-Unlocked Vodafone K3770-Z Modem with any SIM card.

There was no point in creating this post, but because I was affected before due to Useless and Fake Unlocking Methods / Firmwares / dashboards to unlock this modem, posts all over the Web, I am here to warn you about the same.

WARNING:
>>  Please do not follow any tutorial on other blogs, which convey unlocking this PRE-UNLOCKED modem or change its Dashboard !! not following this warning will damage your modem permanently and will no be replaced by Vodafone as your warranty will get VOID. This modem is Factory-Unlocked !

>>  For Surprise, This wonderful Vodafone K3770-Z modem comes Pre-Unlocked from factory, So you need not attempt to flash its firmware with custom one.

>> It is necessary that you let install Vodafone Mobile Broadband Lite Software (Default Dashboard), when u just Plug-in your K3770-z USB Modem for the first time in your Laptop / PC.

So here we go,

>> The  Vodafone K3770-Z modem comes with its on Connection Manager "Vodafone mobile broadband" Which will only accept Vodafone SIM cards.(It is necessary that you use a VODAFONE SIM card only for the first time Install), But if you Ignore (Press Close) the pop-up message shown by it, soon you will discover It starts showing the signal strength which means, it accepts other sim cards explicitly.


>> All you have to do now is, Close this connection manager and Single Left-Click on the Network icon near clock in Windows 7 to show up connections.

>> In  it, it will show all the Connections that your PC has support for, including the K3770-z USB modem with Signals Bars.


>> Right click on this USB Modem Connection and Select Properties, You should see a Window showing up like this:


>> Now Select the "Profile" Tab (2nd), Enter the APN of your Mobile Service Provider (must enter), Username and Password (leave blank if not provided).

>> And hit "OK".   Congratulations ! Now you can Press - "Connect" from the Left click Menu on the Network Icon near the clock. The connection will dial and disappear automatically.


See I just transfered 950mb in just 29minutes on Airtel 3G. hahaha :D :P. This is a Windows 8 snapshot below:


>> Problem :  You will not see the "Profile" tab in Properties. The "Profile" tab will not come, If you used another SIM card (Non-Vodafone) for the First time install.
>> Solution: Put Vodafone SIM card in it, once it is recognized by Vodafone Software, you can then replace it with any SIM cards and use them. This has to be done only once for every new PC / Laptop you plug your USB Data Card for the first time.

If you wish to use this modem on Windows 8 also Follow this link: Vodafone K3770-Z ON Windows 8

If you wish to use this modem on Linux also Follow this link:
Vodafone K3770-Z on Linux Ubuntu, Mint
Read more...

Saturday, October 30, 2010

Installing MeeGo on the Nokia N900


Installing the MeeGo Handset Image

These instructions will guide you through installing the root file system on an external Micro SD card, to be used with the Nokia N900 handset.

WARNING:

MeeGo is an open source project and if you choose to install the MeeGo image to your N900 device, you do it completely at your own risk. If you are not confident that you know what you are doing with it and why, please don't use it at all. Especially now, if you start playing with call software under development, you need to watch after your phone bill, as well.

These instructions will guide you through installing the root file system on an external Micro SD card, to be used with the Nokia N900 phone.

You will need:

* Nokia N900 phone and USB cable to connect it to the PC
* Micro SDHC card, with a preferred capacity of at least 2 GB and class 6 or higher
* MeeGo Handset Image for N900

Note: The Micro SDHC card will be erased during these steps, so you should not use a Micro SDHC card that contains information you may need.


MeeGo Handset Images for N900 consists of two parts:

* The meego-handset-armv7l-n900-{ID}-mmcblk0p.raw.bz2:
This file contains the rootfs with the Handset UX experience that is flashed to micro SD memorycard.
* The meego-handset-armv7l-n900-{ID}-vmlinuz-{ID}-n900:
This file is the kernel that is used to boot to the MeeGo Handset image.

To boot Nokia N900 with MeeGo Handset UX image, you must copy the rootfs image (*.raw) of your choice, to the Micro SDHC card.
Using Linux

Once you have downloaded your desired image from the download location, you will need to extract the compressed file.

$ bzip2 -d meego-handset-armv7l-n900-*-mmcblk0p.raw.bz2

This will uncompress the Handset Image to the current directory.

After inserting the Micro SDHC card into your card reader, you will need to determine the proper device designation for your card.

If your system does not auto recognize your Micro SDHC card, you can manually find it by executing fdisk.

$ sudo fdisk -l

Running the command above will result in an output similar to this:
Disk /dev/sdX: 3957 MB, 3957325824 bytes
194 heads, 30 sectors/track, 1328 cylinders
Units = cylinders of 5820 * 512 = 2979840 bytes
Disk identifier: 0x0001ace5

Device Boot Start End Blocks Id System
/dev/sdX1 1 588 1708984 83 Linux

In this example, the Micro SDHC card is referred as /dev/sdX.

Notes:

* Not all systems will use /dev/sdX. Some systems may designate your card /dev/mmcbkY, as well.
* Do not use the partition indicated by the 1 in /dev/sdX1 in the above example. Use the device which would be /dev/sdX.

Once you have determined your Micro SDHC card, make sure that it is not mounted. To list the current mounts, use 'mount' command and use 'umount' command to unmount all the directories that refer to your Micro SDHC card. After you have made sure the Micro SDHC card is not mounted, run dd command, below, to copy the image file to your Micro SDHC card.
Note: Change the if= to point to the proper image and of= to your Micro SDHC device.
$ sudo dd bs=4096 if=meego-handset-armv7l-n900-*-mmcblk0p.raw of=/dev/sdX

Depending on image size and card speed, it can take dd up to 20 min to complete this operation. After this operation is ready, you should see output similar to this:
475136+1 records in
475136+1 records out
1946157057 bytes (1.9 GB) copied, 214.382 s, 9.1 MB/s

Now the image is in your Micro SDHC card and you can move to the "Booting MeeGo Handset Image" section.
Using Windows

To use Windows (XP, Vista, 7) to copy the image to your Micro SDHC card, you will need to make sure:

* You can unpackage the image file. To do this you will need a compression utility, like 7-Zip http://7zip.com
* You have an image writer utility, like Win32DiskImager.exe
https://launchpad.net/win32-image-writer/+download

Using your preferred compression utility, extract the contents of the downloaded image. Once uncompressed, you will have a named directory containing the MeeGo Handset Images.

Once you have extracted and located the image you wish to install, use your preferred image writer to write the image to your Micro SD card. Here's an example of the process you may follow to use the W32DiskImager:

1. Run W32DiskImager.exe.
2. Select the desired MeeGo Handset Image.
3. Select the drive letter for your Micro SDHC card.
4. Click the "Write" button to start writing the MeeGo Handset Image to the Micro SDHC card.

Booting MeeGo Handset Image

To boot the image on Nokia N900, you need to get the flasher application from http://tablets-dev.nokia.com/maemo-dev-env-downloads.php. In the page, there are multiple different binaries for different Operating Systems (OS). Get the binary suitable for your own OS.

After downloading the suitable binaries, install/unpackage the package.

With the flasher, the kernel is loaded to the device, which means that the original Maemo kernel is returned when the device is powered off. Here are the steps to load the MeeGo kernel to the N900 device.

1. Remove the back cover and the battery from the device.
2. Insert the microsd memory card into the device.
3. Insert the battery into the device, but do not power on the N900 device.
4. Place back cover onto the device. If not present, the device will not detect the Micro SDHC card properly.
5. Start the flasher with the following command:

Linux:

$ sudo flasher-3.5 -l -k meego-handset-armv7l-n900-*-vmlinuz-*-n900 -b

Windows:

$ flasher-3.5.exe -l -k meego-handset-armv7l-n900-*-vmlinuz-*-n900 -b

* When the flasher is started, you should see following message:

flasher v2.5.2 (Oct 21 2009)
Suitable USB device not found, waiting.

* If you see the message shown in 6, then connect the N900 with USB cable to your PC and the flash should start automatically.

Message similar to
Found device RX-51, hardware revision 1801
NOLO version 1.4.14
Version of 'sw-release':
Sending kernel image (1564 kB)...
100% (1564 of 1564 kB, avg. 16638 kB/s)
Flashing kernel... done.

should be shown. After this process, the device should boot to the MeeGo Handset UX.
Read more...

Saturday, October 16, 2010

How to slim down Windows 7 to make it work more faster and lite


Slim down a Windows 7 image (iso) easily with Vlite software. Slimming Windows 7 is easy and fast, also it allows users to boot this OS from a 2 gb pendrive and takes up low space of about 5 gb only compared to 7.5 gb of the original. The slimming is done by removing unecessary windows components which we rarely use, the other advantage of slimming down windows 7 is to install it faster!! the best and easiest way to do so is to use a software called Vlite available free to download. You will also need WAIK to run this program, but you can refer to the other tutorial of using VLite without WAIK.


1.>> The first step is to copy the contents of a dvd image(iso) to a folder in a specific drive.

2.>> Install Vlite and run it as administrator, the first screen you see above asks you to browse the folder in which you have extracted the image of Windows 7 disk.

3.>> After browsing the folder, it detects and loads the windows files and may ask you to select the version to be modified. for example, am choosing Windows 7 ultimate.

4.>> Next step is to select the tasks which you want to perform on this copy of windows. Some of the available tasks are as follows:


5.>> Here you will select the "Components" and "Tweaks" or just components if you dont want any other services to be stopped after completing installtion.

6.>> Under "Components" you can remove the following components and files:

Sample pictures , Sample videos , games , media center , internet explorer , windows defender, windows update lots more....but remember to remove only unecessary components other wise your windows may fail to install.


7.>> Next comes the tweaking task, this will allow you to disable or manual the services just after windows installation. Tweaking to be done very carefully as you may not know the reason why some specific task is not being done by windows, so choose wisely.


8.>> Next you will be allowed to split the image if you want the iso files to be written on a cd. Or you can start building the new image by saving the iso file at a destination which can be later burned on a disk or a Pendrive.

9.>> yooohoo!! you have done it !! :)

Read more...

Saturday, October 9, 2010

How to build your own Super Computer !!

A Super computer is a cluster of two or more computers connected via a networking protocol. The cluster is used to distribute task workload between computers and to provide a fail-safe system to keep a high level of system availability. Familiarity with building computers and installing and customizing operating systems, networks and software is required before building a super computer. So here's how to build your own SUPER COMPUTER !!


1.>> Install the same operating system on the computers to be used for the super computer. Windows NT and Windows 2000 or WINDOWS XP are stable operating systems to use for a Windows-based cluster.

2.>> Connect the computers for the super computer to a local area network (LAN) hub or switch.

3.>> Install a cluster management service and communication software on the computer that will serve as the master computer in the cluster. The Message Passing Interface (MPI) is a stable and easy-to-use software for this task. MPICH is a free version of MPI and can be found at the MPICH home page.

4.>> Extract the software package to a new folder on the main hard drive of your master computer. Copy the ".dll" files from the new folder to the Windows system 32 folder on the main hard drive.

5.>> Run the ".bat" file for the software to install the cluster management service and communication software.

6.>> Repeat Step 4 on all other computers in the cluster.


7.>> Execute the "shell" program found in the new folder on the master computer to detect all other computers in the cluster. Assign each computer a unique address. The super computer is ready to test and use.


Read more...

Thursday, September 30, 2010

Capture text from images easily with MS office 2007 and 2010

If you have googled right then you must reach here, In simple words i created this post because, sometimes it becomes very necessary to obtain a soft and editable copy of an ms word document, but what, when its a protected, non-editable or a scanned image of a document ??? can you simply edit it ? YES! with MS office you can do it in no time.

This process is called as "OCR" (Optical Character Recognition). MS office has a built in tool called as MS Document Imaging tool. This tool by default doesn't get installed in your system, you have to manually select this tool from the setup file.


1.>> The First step goes about the installation of MS Document Imaging tool from the add/remove option on the first screen (when MS office is already installed).


2.>> Under office tools expand >> expand "Ms document imaging" and select "run from my computer" and hit "continue" button below to install the component tool.


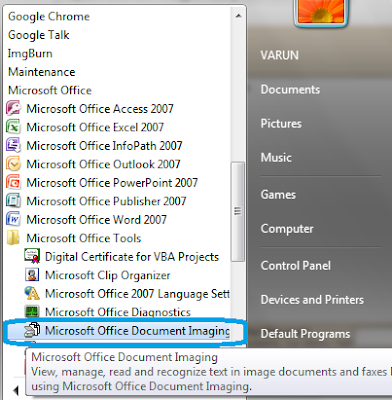
3.>> Upon completion of installation of MS document Imaging tool, select it from the start menu under "Ms Office" folder.


4.>> Now, the important step is to convert the image captured by you into a .Tiff format by opening the image in paint you can do this and saving the image. Here i have saved this Google images website image into .tiff format.


5.>> In MS document imaging, select the yellow folder to open the saved .tiff file image.


6.>> The next step is to press the button called "Recognize text using OCR". this may take a little time if the image is large.


7.>> The last and final step is to import the captured text to a word file, Select the "Text to Word" buton as shown below.
This will transport the file to a word file containing the precious text!


8.>> Here's the magic!! Congratulations!! Not only the text but also its size has been maintained as shown below:

:)


Read more...

Monday, September 27, 2010

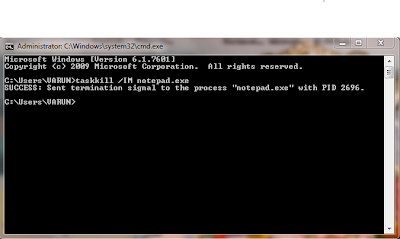
Terminate a process in windows by force.

The ability to perform tasks from a system’s command line allows those tasks to be used in batch files. This trick will help you to kill the process which is disturbing you.


If you know the name of a process to kill, for example notepad.exe, use the following command from a command prompt to end it:


taskkill /IM notepad.exe


This will cause the program to terminate gracefully, asking for confirmation if there are unsaved changes. To forcefully kill the same process, add the /F option to the command line. Be careful with the /F option as it will terminate all matching processes without confirmation.

To kill a single instance of a process, specify its process id (PID). For example, if the desired process has a PID of 827, use the following command to kill it:

taskkill /PID 827

Using filters, a variety of different patterns can be used to specify the processes to kill. For example, the following filter syntax will forcefully kill all processes owned by the user "varun":

taskkill /F /FI "USERNAME eq varun"

The following table shows the available filters and their use:

Filter Name Valid Operators Valid Value(s)
----------- --------------- --------------
STATUS eq ne RUNNING | NOT RESPONDING
IMAGENAME eq ne Image name
PID eq ne gt lt ge le PID value
SESSION eq ne gt lt ge le Session number.
CPUTIME eq ne gt lt ge le CPU time in the format
of hh:mm:ss.
MEMUSAGE eq ne gt lt ge le Memory usage in KB
USERNAME eq ne User name in [domain\]user
format
MODULES eq ne DLL name
SERVICES eq ne Service name
WINDOWTITLE eq ne Window title


For your knowledge:

eq: equals ne: not equal
gt: greater than lt: less than
gt: greater than or equal le: less than or equal
Read more...

Wednesday, September 8, 2010

Connecting to internet on computer using gprs enabled mobile phone over bluetooth

Want to access internet on computer which is restricted to your mobile phone??
So here is the trick to use a simple WAP service generally provided free to users or at very less usage rates.

Most mobile service providers use proxy server to provide gprs facility to their subscribers or they are given predefined settings.
So the first thing you need to know about your wap/gprs service is to find its proxy server address and port no. and APN (ACCESS POINT).

For example BPL service provider in india uses 10.0.0.10 as proxy address and port no is 9401 and the APN name is "mizone".

Requirements:

1.> Blutooth enabled mobile phone.
2.> Gprs/wap service activated.
3.> Bluetooth enabled computer.
4.> Windows Vista / Windows 7.


The first step goes upon like this,

1.>> Add your mobile phone to the bluetooth devices in your computer. and remember to complete the adding procedure properly, because it may seem that its complete but its not always, let all the important services be installed.


2.>> Dont worry if some drivers/ services were not installed. We need the standard modem over bluetooth service be installed. REMEMBER to allow your phone to accept connections while adding the bluetooth phone.

3.> After the phone is added completly, left click over the bluetooth icon to show up bluetooth devices, which lists your phone there.


4.> Right click over your Phone in the list and select "Connect using" ==> "Access point".

5.> By this click, it will start connecting to your phone like a dialup connection, Remember to check screen for activities such as authentication to allow the device to connect as modem.

6.> Done!!! the phone connects to internet sucessfully.

7.> The final settings you will need to make browsing are simple.

8.> Open mozilla firefox or any other browser to look for entering the proxy settings. Open "options" in firefox and select "Advanced" and select "Network".


9.>Enter the proxy settings as specified by your service provided by your service provider.


10.> Close firefox browser and refresh a few times and try browsing google first.
now you have your own wireless internet connected, you can use it anywhre while in bus or train, keep your phone in your pocket and surf the net. Enjoy!!

Read more...

Load balance two internet connections to increase download speeds

If you have two internet connections, you can load balance them to make use of both connections at the same time. You will only see a speed increase with multiple uploads or downloads.
Requires: Two or more network cards.
It is very simple to setup as the function is already built into Windows, but hidden away in the registry. The load balancing method is based on a random algorithm. The functions used are called RandomAdapter and SingleResponse.

1.>>

Open regedit.

Go to [HKEY_LOCAL_MACHINE\SYSTEM\CurrentControlSet\Services\NetBT\Parameters]

Add the valuename RandomAdapter if it does not exsist, make sure you add it as a REG_DWORD (DWORD Value).

Enter 1 as a value data to enable RandomAdapter or 0 to disable it.

2.>>

Add the valuename SingleResponse if it does not exsist, make sure you add it as a REG_DWORD (DWORD Value).

Enter 1 as a value data to enable SingleResponse or 0 to disable it.

3.>>

Reboot your computer.

Done!

Note! Make sure both RandomAdapter and SingleResponse have the data value 1 or the load balancing will not work.
Read more...

Related Posts Plugin for WordPress, Blogger...